
How to Start a Blog with HostGator
I wrote a post about 4 years ago titled, “I Need A Website! Where do I Start?” to help provide information to clients and others with questions about starting a website and paying for web design services. This post is written for similar reasons, but goes into details about the signup process with HostGator.
I have been using HostGator to host all of my websites for about 4 or 5 years now, after making a switch from GoDaddy. Although I loved the customer service I received while with GoDaddy, I hated the fees and the fact that they nickeled and dimed me for EVERYTHING! I did not and have not had that experience with HostGator AND I have been quite pleased with the level of customer service I have received from them, when I needed it.
For my web design clients, I encourage them to procure hosting and a domain name on their own (with guidance from me), rather than paying me or someone else to do it. The reason is so that they own those assets. The last thing you want to happen is for your web designer to get sick, close up shop or something worse, whilst holding the keys to your web presence. It also ensures that you can adequately keep up with and be on top of domain name registration expirations.
I’m Confused. What is Hosting? What is a Domain Name?
If you are completely new to blogging and websites, I’ve probably already thrown around a few terms that you are unfamiliar with. So, here is a brief synopsis of what is needed and makes up a website or blog.
I use the analogy of a house to help explain things. In order to start a blog or website, you need a domain name, a hosting account and website files. Your domain name or URL is like your house street address. In order to receive your mail, the post office needs a street address to send it to. In order to view your blog or website, visitors need a URL (address) to type into their web browser.
To obtain a URL, you need to register a domain name with a domain name registrar. There is a fee associated with doing this and they are typically done in yearly terms of 1, 2, 3, 4 and 5 years. This is something you can do through HostGator and I will go over that process in more detail later in the tutorial.
Your actual house is like hosting. Your house contains your belongings like clothes, lots of shoes and furniture. Clothes and furniture are like your web files. A hosting account or hosting environment is where your web files live. Your web files are the visual representation of your site and are what power and make the site function. They are a combination of what a visitor sees when they navigate to your URL and they are also what churns on the backend of the site to make it all work. HostGator, as the name implies, also provides hosting accounts.
So where does WordPress, Joomla and Drupal fit into all of this? They are what is churning on the backend to power the functionality of your blog or website. They are what we refer to as a CMS, or Content Management System. It’s what allows the average Joe to start a blog site on their own or maintain and update a full website built by a designer.
WordPress is what I use to build full websites for my clients and is probably the most popular CMS for blogs. It is very user friendly, but I will admit that if you are not technically inclined at all…meaning you struggle to use your smartphone, you may not find it so user friendly.
How to Start a Blog with HostGator
Step 1: Choose a Hosting Package
HostGator has plenty of affordable plans that are perfect for starting your blog.
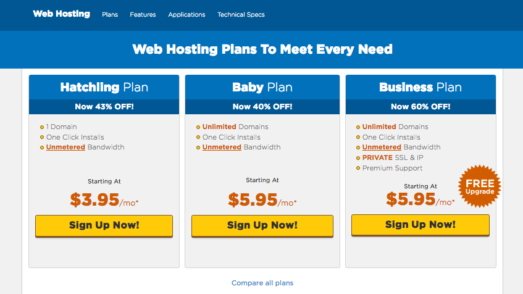
According to them, their most popular package is the Baby plan, because it allows for unlimited domains. This used to be the package I recommended to clients, but I have now started to recommend the Business plan because it comes with a private SSL. This is important because Google recently made updates to their search to identify sites that are ‘secure,’ meaning they have a SSL certificate vs. sites that are ‘unsecure,’ and do not have an SSL. Google is also giving prominence in their search engine rankings for sites that are secured with a SSL certificate.
Once you select a plan, click the bright yellow ‘Get Started Now!’ Button to add the hosting package to your cart.
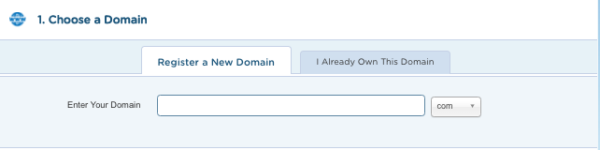
Step 2: Choose a Domain Name
You can use HostGator’s domain registration tool to check for a domain name that is available. From here you can register a new domain name, or click the second tab “I Already Own This Domain,” if you are only buying hosting.
Make sure you keep Domain Privacy Protection checked. This will mask your domain information in ICANN and replaces it with HostGator’s, so that you can maintain a level of privacy. If you don’t do this, you can expect to receive spam and unsolicited emails from people trying to sell you on their services, Viagra, and maybe even to collect an inheritance from a Nigerian prince.
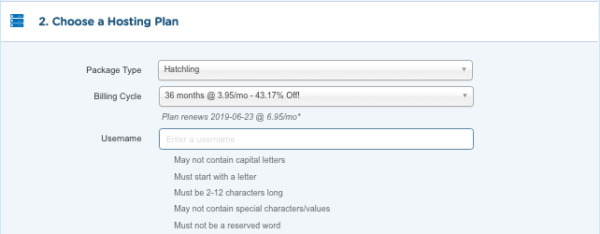
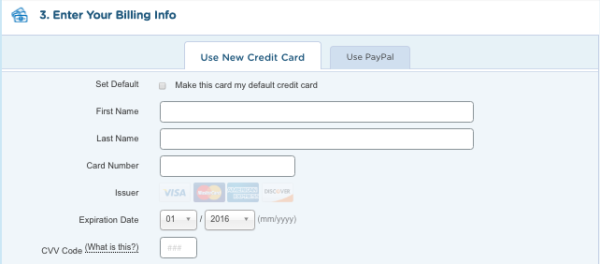
Scroll down to step 2. Here you’ll need to enter a user name and password that you’ll use to manage your hosting account with HostGator. In step 3, you will enter your billing information.
The fourth step is to sell you on a bunch of additional services that really are not necessary. I always tell clients to skip those because I install plugins that take care of most of those items. If you are starting a blog on your own, you can find a decent array of free to low-cost plugins to do those same things.
When you reach step 5, make sure to enter coupon code CEDBLOG25. If you go to HostGator by clicking my affiliate link here, you’ll receive an extra 25% off. Yay for discounts!
Finally, click that you agree to the Terms and Conditions, then the big yellow ‘Checkout Now!’ button.
Step 3: Install WordPress
The next step is installing WordPress, the world’s most popular blogging platform, so you can get to work writing, sharing and posting.
When you completed your purchase, you should have received an email from HostGator with your cPanel username and password. cPanel is the portal you’ll use to manage your web hosting. The cPanel link is unique to you, so be sure to bookmark it for future reference.
If you are a Colleen Eakins Design client and I directed you to this post to help you set up your account, this is the email you need to forward to me. You also do not need to complete any further steps.
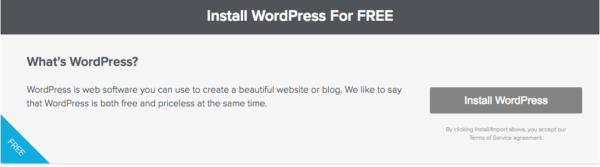
Log into cPanel and click on the Quick Install icon.
From there, you’ll see an option to Install WordPress for free.
Click the Install WordPress button and then complete the form accordingly.
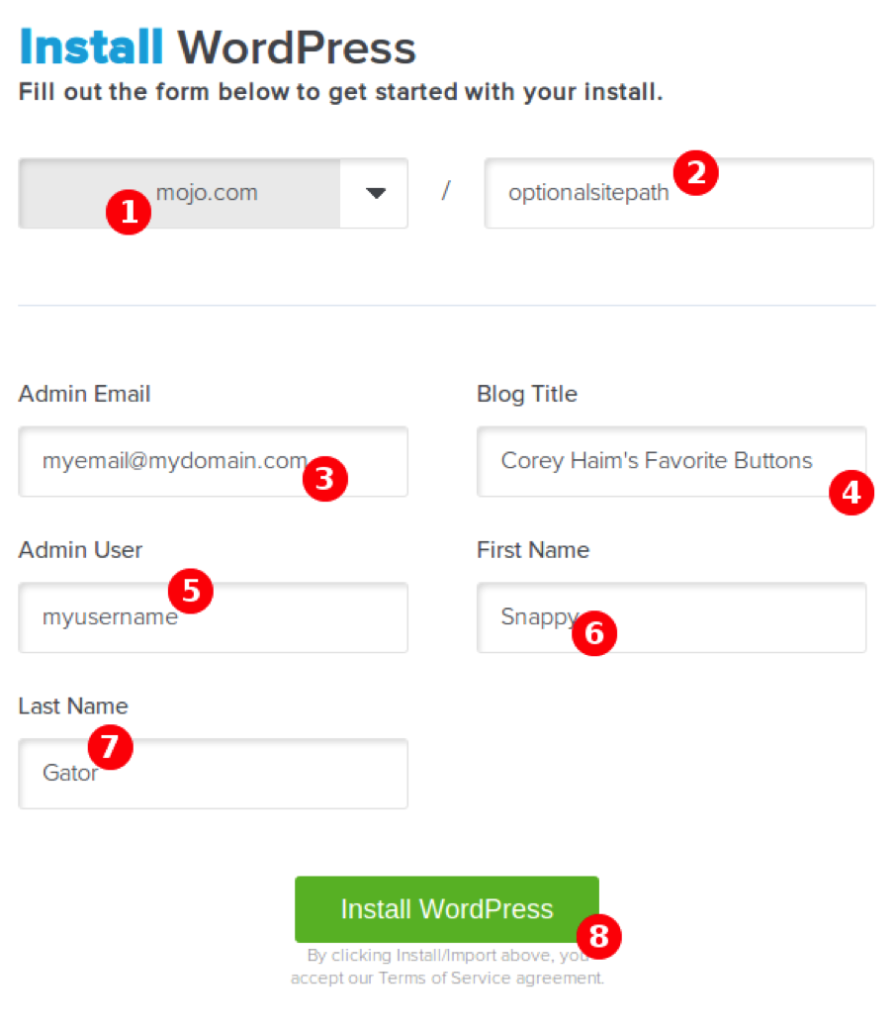
- The Base Domain for your installation.
- The sub directory you would like the site to load from, if desired. You can leave this blank. Example: Should you wish your WordPress URL to be mydomain.com/site instead of just mydomain.com. Your site will always display this extension if you enter one.
- For Admin Email, enter an email address where you want the admin password emailed to. Make sure this is a working email address.
- For Blog Title, enter the name of the website. This is what will appear in the header as the name of your site.
- For Admin Username, enter your preferred user name.
- Your first name.
- Your last name.
- Click Install WordPress when you’re ready to proceed.
A progress bar at the top of the page will let you know when installation is complete. Once complete, you will be able to start working on your WordPress site. Check your email for your WordPress username and password as well as a link to your WordPress dashboard.

That’s it! You are now ready to log into your WordPress blog and start your blogging empire. Remember to save a little dough with HostGator in the process by using the coupon code CEDBLOG25, to get 25% off.
Colleen Eakins is a dynamic and creative individual that possess a knack for great design. With over 15 years of experience in the field of graphic design, Colleen is able to effectively brand her clients with great design pieces. Her motto is: “Anyone can make a pretty picture, but is it effective? Will it make your customer buy your product or use your services? My design tries to answer with a YES!”